Pages

Showing posts with label self-sufficient. Show all posts

Monday, March 4, 2013

The Baby Chicks Are Here!

We picked up our baby chicks today. Some years I order them, but this year I decided to see what the feedstores might bring in, and also see if it's less expensive to buy them locally.

I was well pleased with the variety of chicks available today. White Rhode Islands, Buff Orpingtons, Americaunas (these lay the blue and green eggs), partridge rocks, and a few other kinds were available. I picked an assortment of kinds, 15 babies in all. They are a quiet lot, and seem to be happy in their new home.

Larry originally put a big heat lamp on them which is why the photos look red. I thought we were going to end up with chicken nuggets because it was just too hot, so changed it out for a 60-watt bulb and that seems to provide sufficient heat.

We learned a trick a few years ago: we make a box for them without a bottom, and put down a plastic dropcloth under the box. Then when their bedding needs to be changed, we just pick up the plastic and take it to the woods or the garden to dump. So much neater and easier than trying to clean the bottom of a box.

These little ones are supposedly all pullets. Our old girls will be given away when the young ones start to lay. I find it not at all worth the trouble to dress them out, and usually someone takes them and keeps them to lay for a few more years, which is fine by me. After five years, though, their production is really poor and it's not cost-effective to keep them in my book.

The cats are intensely interested, so we've got the babies under a good security system. The cats usually lose interest in a couple days, which is a relief. I, however, will probably spend a lot of time every day just watching the chicks peck around and sleep. There is something restful about it, and I can dream of them being big girls out in the coop and tending to the business of providing our breakfast.

Copyright 2012 Susanna Holstein. All rights reserved. No Republication or Redistribution Allowed without attribution to Susanna Holstein.

Wednesday, January 4, 2012

Making Tea...Bags

I posted something on Facebook about making teabags and got a few questions, so I thought I would show the process here. It's very simple really:

1. Dry your herbs for your tea. I was making peppermint bags from peppermint I dried last June. Then decide what combinations you might want to put together. I like peppermint, rose hips and orange peel, but this time I just did plain peppermint because that's what Larry likes. You could also make individual size mulling spices with cinnamon sticks, whole cloves, allspice and orange peel to spice up your apple juice, cider or wine. Another possibility is buying bulk loose tea and bagging it yourself.


2. Purchase sealable teabags. I buy mine from the San Francisco Herb Company. They offer a wide selection of teas, herbs, spices and supplies for reasonable prices. The only hitch is that your order must total $30 and that is a lot of stuff! Get out your iron.


3. When your herbs are ready, crush them to the size needed to fit in your bags. Fill the bags,


then seal with an iron set on the "Cotton" setting and NO steam.


4. You're done!

Thursday, July 14, 2011

The Winner of the Coffee Test

A few weeks ago I wrote about my efforts to find a way to make good coffee without an electric drip pot.

We tried a Porcelier, a porcelain drip pot made in the 1930's-1940's, a big aluminum drip pot that makes 18 cups, a stainless steel drip pot because we wanted to be able to keep the coffee warm on the gas stove, and a plastic drip funnel with mesh filter.


The winner is: the Porcelier!


Here is the winning combination: 
  •  Decaf Eight O'Clock beans: I had to order these on Amazon because I could not find decaf beans in our stores here. We went to decaf when my blood pressure got a little higher than normal and honestly I can't tell the difference.
  • My old coffee grinder: I have an electric one but the goal is coffee without electricity. We used this one for years and it does a perfect job. 40-50 turns of the handle (less than a minute) and you have enough for a pot. The pre-packaged ground decaf was too fine to work properly with the Porcelier. The hand-cranked grinder can be adjusted and the coffee brews beautifully and fast.
  • The Porcelier drip pot: This top part of the pot comes off. It has small drip holes in its bottom, and there is another interior lid. You put the coffee in, then put on the interior lid. This lid also has drip holes in it. Then you boil water in a kettle and pour it into the top section. The water filters down through the drip holes in the interior lid, through the coffee and out the bottom drip holes into the pot. 
We found the Porcelier at a local junk shop for $14.95, I think it was. The coffee has to be tasted to be believed. It is just delicious.

The only downside: now we make more coffee so we're spending more! Where a a 3-lb can would last a month or more, now we've used 3 bags of beans in less than a month. Ah me. I guess my next quest is a cheaper source of decaf coffee beans.

Monday, August 31, 2009

The Weekend List

Our plans for last weekend:

Dig potatoes. Plow garden and plant cover crop. Pick grapes. Make grape juice. Pick elderberries. Make jelly. Cut grass. Change the oil in my car. Dress out seven roosters and five turkeys. Go to the Joe's Run Music Jam and get some homemade ice cream. Chill by the fire pit.

What did we actually accomplish?

Dig potatoes. Check.

Plow garden and plant cover crop. Check. Turnips, lettuce, kale and other seeds await the arrival of rain.

Pick grapes. Check. Make juice. Check. Six quarts of purple passion are in the freezer.

Pick elderberries. Check. A pint of deep red juice is reserved for the making of elderberry butter this weekend, due to the promise of my neighbors that it is delicious.

Cut grass. Check. Larry did that while I messed with berries.

Change the oil in my car. Check. Larry was the man again.

Dress out seven roosters and five turkeys. Roosters--check. Turkeys--we wore out. They're on the list for the coming weekend.

Go to the music jam. Check.

Get homemade ice cream. Check--Larry took care of this one.

Chill by the fire pit. Check, for two nights in a row.

It was a good weekend, and pretty productive. As for those roosters, the hens are much happier now that the stress of so much male ego is abated. The constant crowing had to be driving the girls nuts because it sure wasn't making us happy. That makes twelve birds in the freezer for a total of about 45 pounds of chicken.

What does home-dressed chicken look like?


Like this.
What does it look like after it's been cooked?


Like this.
(You thought I was going to show you terrible pictures of the chicken-cleaning process, didn't you?)

Dinner Sunday night was chicken and noodles, made with our home-raised chicken, onions, celery and carrots. It was delicious, and a good way to end a long day.

Wednesday, July 29, 2009

Corn and Squash and Garden Talk

Menus this week:

Corn, tomatoes, cucumbers.
Corn, tomatoes, squash, chicken.
Corn, tomatoes, squash.
Corn.
Tomato sandwiches.
Corn, steak, squash, salad.
Do you see a theme here?


Larry's corn patch--some of the stalks of sweet corn are around ten feet tall. I began to wonder if he'd planted field corn instead of sweet corn.
Corn is at the top of the agenda, and the menu. Right now our corn is at its peak, and it is something to experience. Did you know that two bushels of corn in the husk equals one bushel of husked corn which equals 8 quarts of frozen corn? Except tonight, one bushel of corn in the husk yielded 6 quarts of frozen corn.


A different variety meant smaller cobs, more corn. This year we raised Sunglow for early corn and froze corn on the cob. Next to come in was Seneca Chief, big ears of yellow corn that clean super easy, hardly any silk, and mighty tasty. Now the Honey and Cream corn is ripening--smaller ears, but extra sweet with both white and yellow kernels on the same cob. Hard to clean though, lots of silk and bits of husk to deal with. I had not noticed these differences in other years, mainly because usually I only grow Sunglow and Silver Queen. This year we experimented and I'm happy with the results. Seneca Chief is a keeper.


While I often can corn, freezing is much easier. And I'm out of pint jars, so freezing is the only sensible option because the two of us would never eat a quart of corn at one meal and it would go to waste.


To freeze, we cut the kernels off the cob, blanch for one minute in boiling water, dunk into cold water, spoon into bags and freeze. So far we have 14 quarts in the freezer and I expect to add another 8-10 quarts.


Every day that I am canning or freezing I bless my big enamel pans and wonder how I managed without them in the past. I bought them last year, some at an antique store (but at a good price), others at the Rockport auction for a song. One is a sieve, excellent for rinsing.

By this time next week, fresh corn will probably be a memory.

Of course, the Indian corn is nowhere near ready...

Wednesday, July 22, 2009

Easy Way to Freeze Corn

So the guy who tells me about this is young and single. Why did I believe him? Because I had a bushel of Early Sunglow corn to deal with and no time to do anything fancy like cutting it off the cob and blanching, etc.

"It's the easiest thing ever," he said. "Just trim the outer leaves, pull the silk to remove what you can, then pack in freezer bags, vacuum seal, and freeze."

"That's it?" I asked. "No blanching, cutting off the cob?"

"Nope," he said. "Easiest thing in the world."

Easy things usually don't end up well. Usually you get what you pay--or work--for. But I had all that corn, and it would go to waste if I didn't try something fast.

So we followed his instructions, feeling doubt all the while. I trimmed the outer leaves, pulled at the silk tassel and packed the corn in bags. I don't have a vacuum sealer so I pressed out as much air from the bags as I could. They were pretty flat around the ears.

This evening we tested the corn. We started the grill and threw on a few ears straight from the freezer, and wrapped others in foil and put them over the coals. The result?

The ears put over the coals in their own husks, minus foil, were perfect and delicious. Steam from inside the husks evidently loosens the silk, so when we pulled back the husks the silk came away too.

The ears in the foil took longer to cook and weren't as good. They were a little softer. Perhaps with hotter coals they would have been fine. They were still just as good as any frozen corn on the cob I've ever eaten and better than most.

Bottom line: this is absolutely the easiest way I've ever, ever put up corn. Amazing.

Will it be as good in a month? Two months? I don't know, but after one week it was delicious.

Wednesday, June 17, 2009

Of Cabbages and Kings--Make that Beans

More pics from the garden:

The cabbages--Savoy and Stonehead--are ready to cut. I do not remember ever having cabbage ready this soon, a testament to growing your own plants. We started our seeds in the greenhouse at the beginning of March.


The Savoy cabbages are on the left, just above the red Romaine lettuce. Savoy is a good, sweet cabbage with firm heads; it's a a good keeper. The Stonehead cabbages are supposed to hold for a good while in the garden, but these are already showing signs of cracking, probably because of all the rain we've have. So we'll harvest them all now and not take a chance on them rotting. You can also see the onion tops laid down to dry; lettuce and radishes have been planted in the row between the cabbages and onions, where the peas were pulled out. On the far left are half-runner beans, Larry's favorite, planted in April and getting ready to set beans now that the vines are in bloom.

Some of the Stonehead cabbages will be turned into kraut (I hope) on Sunday. A head or two will be kept in the fridge for use in the coming week or two. The rest will be frozen for winter and to use when I make vegetable soup. I will post photos of the kraut making if we actually do it. It's going to be a busy weekend with storytelling, and my birthday is Sunday, but we'll see what happens.

In the lower "big" garden, the early Sunglow corn is beginning to tassle--we might actually have corn by July 4th this year. We took a chance and planted this seed in mid-April, far ahead of the last frost date. Our gamble paid off this year. Potatoes are on the left, beans on the right.

The beans are already setting on and will need to be picked next week, I think. These are Royal Burgundy purple-podded beans. They turn green when cooked and have a flavor very like Blue Lake or half-runners. We should have plenty to can this year! The electric fence has done its job so far at keeping critters out.


The Silver Queen is at the right of the beans, and we planted pole beans in with it this year. Both the corn and the beans are doing well. The beans are beginning to climb the cornstalks so I hope the corn grows fast!

One last pic that has nothing to do with beans, cabbage or corn. This one shows the grapevines near the big garden. What you can't see in this photo is how full the vines are. Pears, apples and peaches will be scarce because of untimely frosts, but goodness will we have grapes!


Monday, June 15, 2009

In the Garden


What's going on in the garden now? Here's what Larry's been up to while I was at the writers conference this weekend:

The peas and spinach are finished and the chickens enjoyed the pulled-up vines and greens. He put the last of the peas in the freezer and put away the pea trellis.

The tomatoes are staked, pruned and mulched.

More cucumbers, lettuce, radishes, basil and nasturtiums are planted.

All the gardens are tilled and hoed.

The onion tops are bent down to start drying so we can pull them for storage.

Next on the to-do list?

Continue spraying the grapes for black rot. If we don't spray, we get no grapes at all. With the wet weather, the blight is likely to be bad this year.

The beans are in full bloom so we'll be picking in a week or so, I think. That means canning time. The beets are close to being ready to pull too. I haven't checked on the carrots yet but they were planted later.

The mulberries are almost gone and I did not get any put up. However the birds and the grandchildren enjoyed them, and I have quite a few jars of jam left from last year's crop.

The new strawberry patch needs to be weeded and the new asparagus plants need to be hoed.

The last flower bed still needs to be planted. I have put out very few annuals and no marigolds which seems very odd. My gardening time is usually in May but this year's rain precluded a lot of the things I normally do. Now that we're into June, storytelling will be keeping me out of the garden in my off-work time. So this year, what's done at this point is pretty much all that will get done.

I am disappointed in my herb garden--many seeds did not germinate, the dogs dug up what was doing well, and it just looks yucky. I am thinking about moving it to a new, sunnier location next year and finding fencing that will keep the dogs out.

That's all the news that isn't in the gardens at this point. What's going on in your garden?

Sunday, May 31, 2009

Garden

Larry has put a lot of time in the gardens this year, and we're seeing early rewards.

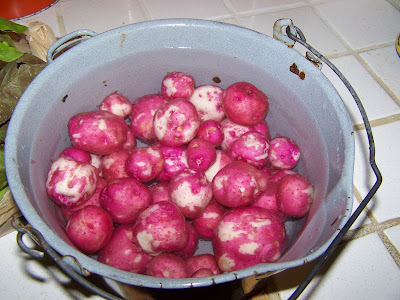
Yesterday we got our first new potatoes of the season. I only had to buy one bag of potatoes between our last year's stored spuds and this year's new ones--and most of the bag is still in the fridge.

Some of what's ready in the garden now: radishes, three kinds of lettuce, snap peas and potatoes. Also ready: spinach, chard, onions, beets. Coming next will be cabbage and green beans. The beans we planted (defying the frost date) on April 12th are almost ready to bloom.

But these potatoes, these are the thing we look forward to every year. We're not big potato eaters--except for new potatoes. Add butter, maybe a little parsley, and eating doesn't get much better.

Tuesday, May 26, 2009

Spring Greens

This is a good time of year. The garden greens are in lush abundance--snap peas, spinach, chard and beet greens. Larry picked a 5-gallon bucket of them so after work I set about freezing them.

The first peas--just about enough for a snack, but a precursor of things to come.
Beet greens! A sinkful of them...


...but when steamed for a minute or so, they only fill a few baggies.

We ended up with 10 half-pint baggies of greens. Each baggie is a serving each for us. I'd like to have about 40 baggies in the freezer. I mixed the beet greens, spinach and chard tonight.


To freeze greens:

Pick, wash and clean them. Keep the best for freezing.

Boil water--I used about 4 cups in the clam cooker. I put the greens in the strainer basket and after the water boiled, I put the basket into the pot.

After about 30 seconds I stirred to be sure all the greens were getting steamed. After one minute, I took the pot off the burner, removed the strainer basket of greens and rinsed them under cold water.

Then I bagged them up and put all the small baggies into one large freezer bag and put them in the freezer. They're ready to use whenever I want.

As for the peas? We'll eat them raw and look forward to picking many more.

There is nothing like Spring gardens. We have lettuce, onions, radishes and greens now, with other veggies coming along quickly. Planting early has rewards that are worth the risks (like frost) and the work.


Thursday, April 23, 2009

More Babies

But these babies are real turkeys--really!
At the feed store, bronze and white turkey poults mix it up.

Aunt Kate (the new Aunt Kate to baby Cadyn) carries the babies home.


In the carrier; someone is mooning us!


Mirror image?

These two are exploring their new home.
And finally settled down for the night.

Wednesday, March 4, 2009

Garden Talk


The seeds are sprouting now--broccoli and Savoy cabbage are first of course. The tomatoes will be next, possibly the celery soon after, then the leeks and bringing up the rear, the peppers. All other seeds will either go into the garden as is, or be started later in the greenhouse.

I found an inexpensive way to start my seeds in the house this year. I saved my yogurt and cottage cheese containers for just this purpose. We poked holes in the bottoms of the containers, filled them with seed starting soil, and zipped them up in baggies. Voila! Miniature greenhouses. So simple and I cannot think why I haven't done this before. Live and learn. I have the containers in pans so I don't ruin my table top when I water them later on--if I need to. They may not even need it before I move them outside to the greenhouse.


I have to laugh every year when I look at the tomato seeds I buy. This year's selections? Lemon Boy, Yellow Pear, Mr. Stripey, Brandywine, Mortgage Lifter, Better Boy, Early Girl, Amish Paste, Sweet 100's, and one or two others I can't recall. I know, I know--overkill. But each one is unique in flavor and use! Which ones can I not grow? That's like asking my mother which of her thirteen children she should have gotten rid of. Not possible.

The greenhouse is still in the box. I bought one online this year from OutdoorEdge, through eBay. What's it like? I don't know yet. I think it's going to be pretty flimsy and I'm worried about how it will hold up in our high winds. But Larry seemed to be finding all sorts of things to do besides build me a new pole greenhouse (last year's was in a bad location and now we use it to house the wood splitter) so I thought I'd give this a try. I'll post pics when we put it up so you can see what it looks like--and how easy/difficult it is to assemble. At $109.00, I figured it might last a couple years anyway, but not much longer.

What else is going on with the gardens:

  • Larry hauled 3 loads of ancient manure from our son's barn and spread it on the gardens

  • He also burned a pile of brush on one garden--nice addition of potash

  • Today he plowed one garden and will plow another tomorrow if the rain holds off

  • We've decided to put up electric fence to keep the deer out. Last year they ate more green beans than we did

That's all the garden news for now. What's been going on in your garden?

Thursday, December 18, 2008

Building the Log Cabin Room

I've mentioned the log room or cabin room many times on my blog, and have shown it in a few photos. I found some of the photos I took of the process we went through to tear down, move, and rebuild with the logs and thought some people might be interested in seeing them.

This cabin was located on Spruce Run in western Jackson County, WV. It was located on land that was previously a 1000-acre farm and there were 10 cabins plus at least one log barn and a much larger frame house at one time on the property. The family that had owned the land were named Livingston, and a descendant sold the cabin to us for $500. A lot of people thought we got ripped off. It was full of trash and we had to wear a respirator and gloves when working on it at first because chickens had been kept in it and there was dust and manure everywhere, even on top of the boxes of stuff stored in there.

Unfortunately the owner came in and threw much of the contents outside and burned them. A real pity because there were many blue canning jars, old books, letters, etc in the cabin before he "cleaned" it. We told him not to worry about the rest, we'd do it. So we were able to salvage about 30 blue jars, several other types, a few old letters, cards, etc. I will post photos of some of the items we saved in a future blog.


December 26, 2002: Here is the way the cabin looked when we bought it. Some of my sons would not even get out of the car to look at it when we first purchased it--the ground around it was poorly drained because someone had added a pond nearby and had not down the grading properly, so the ground was muddy, something smelled rank and trash was strewn everywhere.


As you can see, the foundation stones were giving way and the roof was nearly gone so the cabin would not have stood much longer.


Tommy and Jared stand beside a pile of trash on day one.


January 5th, 2003: I didn't get pictures of removing the roof as I wasn't there on that day. Here you can see how the logs were lowered. We tied ropes to the ends and on the other side of the wall are two people desperately clinging to the ropes as they gently lower the log down the ladder. Primitive, but it worked. The logs are mostly oak, with some chestnut, poplar and a few pine. They are 8" thick, and the ones on this side of the cabin were 19 feet long.


January 12th: Russell Bergdorf, Tommy, Zack Kessell and Larry consider their next move. Look at the beautiful fit of the dovetailed logs.


Jared standing in what's left of the doorway.


January 13th: Zack and Jared sit on the wall and survey the floor--which turned out to be tongue and groove random-width planks in surprisingly good condition.


January 13th: Zack and Larry celebrate--we were done with the disassembling part!


January 20th: The next workday, the cherrypicker truck arrived and hauled the logs to our place. We had to hand carry the logs up a slight hill to the road at the old location because it was too slick for the truck to get to them. How did we manage to move 600-lb logs? With steel fenceposts slid under them and carried like a coffin with all-bearers on either side. It took 6 men to move some of the logs, but we got it down in cold January weather.

January 20th: a few of the work crew that helped carry the logs and get them moved: from left, me, Steve Baldwin, Tommy, Timmy Crook, and Derek ,along with our beloved old dog Pup.


July 2003: I don't have too many photos of the rebuilding process because Larry and Tommy worked on it during the day while I was at work, and I just didn't think to take photos. Larry laid the block foundation in May, then we saved money until July for the floor joists and sub floor. We used 2x12 joists spaced 12" apart to make the floor extra strong for the slate we planned to use on it. Larry used a block-and-tackle pulley rig that looked for all the world like a gallows to lift the logs into place. He did many of them alone or with Tommy's help.


Larry's often-disappearing cousin Mike resurfaced just in time to help put the roof on.

Our son Aaron helped with this part too. Actually, all our sons helped at some stage of the building process--a real family affair in the end.


The exterior of the finished room in 2005. To say we love this room is an understatement!

Cost: the total, including the fireplace, foundation (it's about 8 feet high in front, I think, so it took a lot of block and mortar), framing, insulation for the floor and roof, and inside finishing : $5000. We also had to build a new deck, and it's a lot bigger than the old deck. So that was an additional $1500.

Sunday, November 30, 2008

Venison, Herbs and Comfort

It's been a gray, rainy day today. What to do on such a day?


We could sit inside by the fire, which was very inviting this morning...

but there are those herbs I dried that need to be crushed and jarred...

and then there is the deer meat that was cut up yesterday...

and stored in the freezer in freezer bags.
We could can some of it...


and grind some of it into hamburger...


So that's what we did. One deer equaled 7 quarts of canned meat and 1 quart of burger. We still have one more to process, and it will all be ground into burger.


Then there were some pears that still needed to be worked up. What should I make with them? See tomorrow's post to find out.

Larry had some lights to put up in the cellar top. A local grocery store went out of business and is being remodeled. He got 4-foot fluorescent lights, with covers for $5 a fixture. Our outbuildings will be well-lit when he's finished installing the new lights.


After all that work, the fire seemed like a good friend for our tired feet. And that is where I'll spend the rest of the evening.


If you are interested in canning meat, it's very easy. The meat is fully cooked by the end of the process and that makes it very convenient to use, especially those times when unexpected guests show up.

Here is one place with instructions for processing venison by freezing, drying canning, mincemeat, etc. I trust this website's authority, which is important when it comes to processing meat.


And now to rest!
Related Posts Plugin for WordPress, Blogger...